Part 7: Setting Up Worklists for Smart Goals
(If you missed the beginning of this series, click here)
Now that we have our framework for our SMART collection, we need to add some sub-tools to get the work done. For this, we will be adding three tools within the collection: A Scope Check tool, an Action Plan, and a Metrics table to capture the before/after measurements.
First, we will add a Checklist tool, to let us list the initiatives or corrections we could put in place, then utilize the checkmarks to define which are in-scope, and more importantly, out-of-scope.
Add a new Checklist tool by using the “Add Tool – Browse Tool Catalog…”, then on the “Basic” list, select “Checklist”.
This time, instead of “moving it to the bottom” of the canvas, we are going to add it to the collection instead. To do this, each tool has a “More Actions” option. In that menu, you should see “Move To Collection…”
Here, we will move it to our SMART Goal #1 collection.
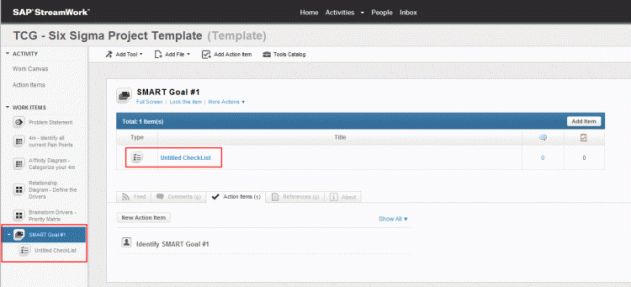
At this point, your canvas for your template is getting fairly complicated. Please note that on the left-side of your template, you will find the “Work Items” section. This section essentially lists out your tools in the template (or when live, an actual activity). It is simple to just navigate down the tool list by clicking on the focus item you wish to review. For example, if we click on the SMART Goal #1 collection, we will see the list of sub-tools within the collection. Here we see our newly added (unnamed) checklist.
Click on the Checklist in the canvas, and rename it to “#1 – Brainstorming / Scope Check”. Then add 2 Action Items to the tool: one for Brainstorming, and another for scope check. Your final tool will look like this.
Next, we want to add a Timeline tool to the collection. Again we use “Add Tool – Browse Tool Catalog…”. The Timeline tool is located in the Coordinating section.
Remember to move it to the collection:
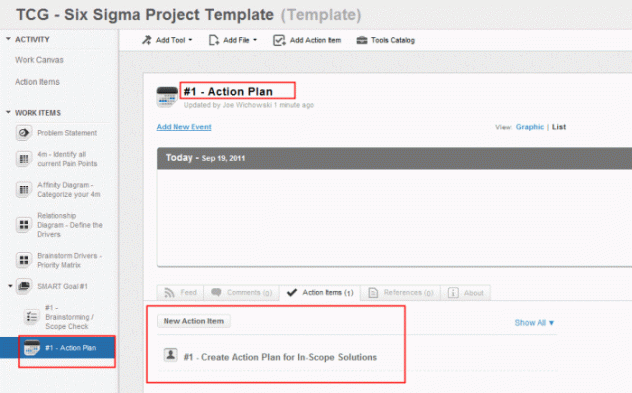
Rename the Timeline to “#1 – Action Plan”, and add an Action Item to prompt the team to create the action plan.
The final tool we will add is a simple table to keep track of our metrics. Again, we use the “Add Tool – Browse Tool Collection…”. Tables are located on the “Basic” list.
Move your table to the Collection.
Finally, setup your table with 3 columns (Metric, Before, After), and delete the 4th through 8th rows (3 metrics are usually fine). Rename your table, and create an Action Item for the team to fill it in. Your SMART Goal #1 should now be complete.
Finally, we need to duplicate our efforts for SMART Goal #1 to create SMART Goal #2 and SMART Goal #3. There is a “copy” function of each collection that will help us achieve this. The Copy function is located under the “More Actions” menu of the collection.
This will copy the items within the Collection to a new collection within a template. Be sure to select your Six Sigma template. Now, you simply have to rename all of the items within the collection. (NOTE: You may need to refresh your browser window in order to see the new collection within your template)
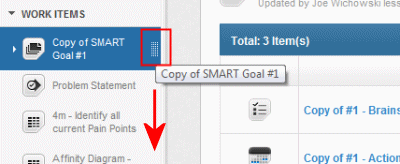
You can move the new collection to the bottom of the list by selecting the grey-bar next to the collection when you hover over it. When you do this, you can click-and-drag the collection down to the bottom of the canvas (after the #1 goal).
Now, rename the collection and the tools to represent SMART Goal #2.

IMPORTANT: There currently is an issue (or feature?) with the Copy function. It DOES NOT copy any action items. So, this means that you will have to go back through every tool within SMART Goal #2, and re-create those action items within the template. Kinda a bummer!
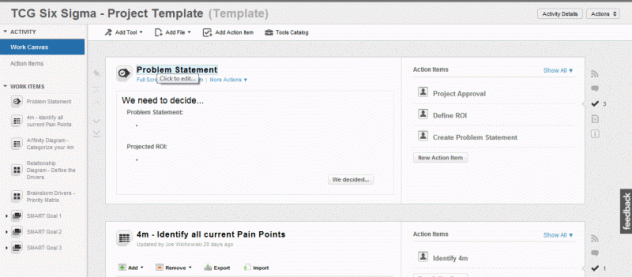
 Finally, copy the SMART Goal #1 one more final time, and make it SMART Goal #3. Remember to rename all tools, and re-create your Action Items as above. You should end up with a template and a Canvas that looks very much like this:
That’s it. Your StreamWork Six Sigma template is now complete. This template should help define a winning process to focus teams, and tackle any form of challenge within your company. In the next section, we will walk you through an example project, to see how all the pieces come in to play.
 Traction Consulting Group


Ronald gomez 4:32 pm on November 7, 2011 Permalink |
Sorry, but my question is – is it possible to make a gantt diagram with sap Streamwork? thanks
Joe Wichowski 9:14 am on November 8, 2011 Permalink |
Unfortunately, no. The closest tool is the Timeline tool. But for us, it functions more as a “milestone” tool than a true Gantt Chart.